
In this post, we’ll cover what determines a robots actions. Why do robots behave or move they way they do? What is the goal of a given robot? We explain these questions with numerous illustrations to highlight robot decision making. So, how does a robot decide what to do?
Now that we have learned how a robot can sense its environment and how a robot knows where it is and can build a map to navigate with, how does it decide what to do? How does it know how to get from a starting point to a goal point on its map? The answer is by planning. In robotics, a planner is used to process information about the map and environment and goals, and decide what to do next. As we have learned from our initial definition of a robot, as a goal oriented machine it has a goal it is trying to achieve. Taking a mobile robot as an example, the goal could be going from one spot on the map to another, a specific use case known as path planning. When picking a path through a map, there can be multiple ways to go from a starting point to a goal:
We use the purpose / goal of the robot as a cost function to help guide our choice on what the optimal best option is (which path would reduce the cost of taking it the most, where cost could be time, distance, or anything we decide!). Specific rules such as stay away from walls or get to the goal as quickly as possible are known as heuristics. In the image above, we can see the second path has a heuristic to favor staying close to walls.
As we previously learned mobile robots build a map of the world, and a closely related topic used during the robots decision making / planning process is the robotic costmap: a map that incorporates the cost of traveling to different parts of the map (a robot usually wants to reduce cost to make its decision of how to travel from one spot to another). A costmap may look like:

The different colors on a costmap reflect the different “costs” associated with traveling in a given part of the map. To prevent the robot from running into walls, you would associated a very high (infinite) cost with walls, so that the robot would never choose to travel through the wall. You would also created a “buffer” around walls to account for potential errors in your sensors, so that you don’t run into a wall accidentally because you thought it was farther away than it actually was! A search algorithm would then be used on the costmap to find the shortest (least cost) path between your starting and goal points:
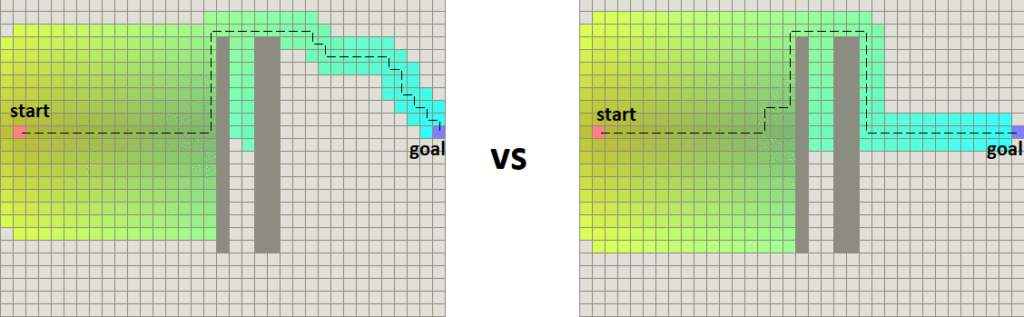
A greedy (best first) search would simply always pick the next point on the map that gets you closest to the goal, however it has the downside of then getting stuck around obstacles. This will find a path from start to end, but it may not be optimal (actually the shortest path from start to end):
A famous optimal search algorithm named Dijkstra’s uses a “wavefront propagation” technique by which you continually expand your search from existing searched places by one extra unit of distance, until you find your goal. In this way, you are guaranteed to find the goal with the shortest path:
As a result of finding the shortest (least cost) path, we’ve chosen the best (optimal) path based on the behavior and heuristics we had chosen to determine the costs!
Path planning is closing associated with trajectory planning and motion planning, which are after a robot has decided what to do, how it actually actuates and moves itself in the real world to achieve the planned path. This requires taking in sensor information about the environment and making corrections to continue following the path:
Taking a step back and looking at the big picture, the process in which the robot plans what to do next and acts on it (i.e moving a wheel by powering a motor, or moving an arm) is done in a control loop. When a planner is used and sensor data is incorporated in a robots decision of what to do next, we call this a closed loop control system. The name closed loop comes from if you were to visualize the control system, we can see a loop:
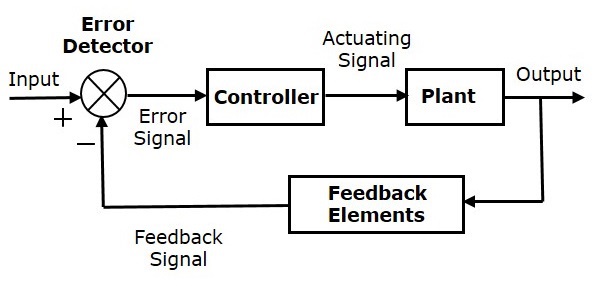
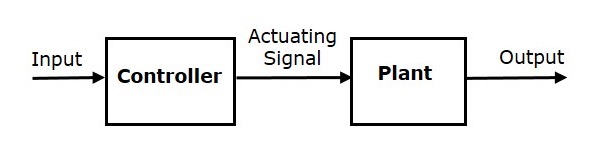
The feedback elements such as sensor input is used as input to the controller. The plant is the technical term for what is being controlled in the control system, such as a motor to drive a car. If the robot did not use sensors to help it make decisions on what to do next, the control loop would be an open loop. If we were to visualize an open loop, there is no real loop so we call it “open”:
Examples of closed loop systems can be if you instruct a robotic car to drive forward 500 feet and then to the right 200 feet. The car could follow the instructions, but without any kind of feedback system, could end up far from its goal because it doesn’t know how far it went. Now that we have learned open loop vs closed loop, open loop factory “robot” does predefined motions (like a copycat) vs closed loop takes in information about world and what it should do.
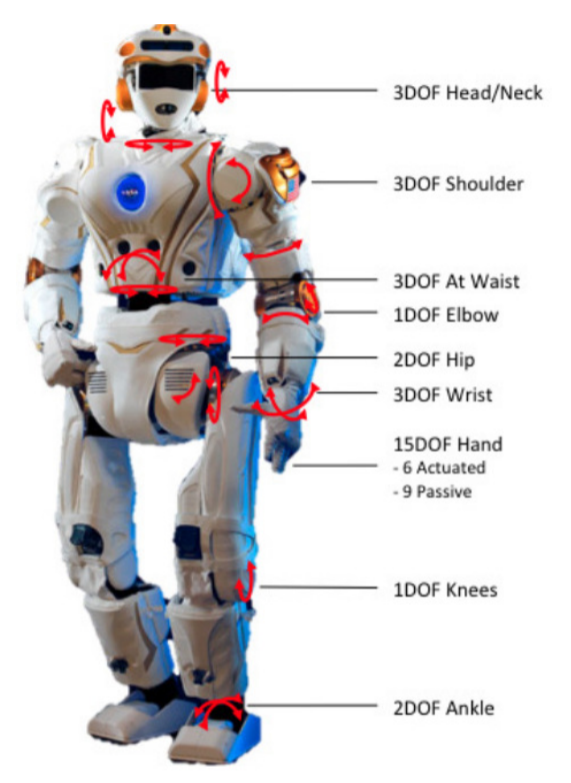
As multiple types of robots exist with one wheel, two wheel, arm, the plan for each robot will differ. Each joint in arm represents different potential movement, which we call a degree of freedom. When a robot decides what to do next, it can choose to change any of its degrees of freedom. The more degrees of freedom a robot has, it allows robot to perform more complex tasks. The combination of all the possible ways a robot could change its position in space is known as the configuration space. The configuration space represents the environment bounded by robot geometry and obstacles, with free state representing collision free space where the robot can move (i.e a Roomba can drive on your floor but not though a wall). The path planning & trajectory/motion planning lead to plans within the configuration space. On the left, we can see the Nasa Valkyrie robot has a lot of degrees of freedom, allowing it to move its arms and body in many directions!
Finally, we’ve reached the end of our initial robotic learning journey. We’ve learned:
- What is a robot
- How a robot understands its environment with sensors
- How a robot can see with cameras and LiDAR
- How a robot builds maps of its environments and knows where it is
- How a robot plans and decides what to do next
This covers the majority of key components you will need to learn to understand how robots work! If you are ready to try building your own robot, check out our other robot learning opportunities!


